Important links to find adapters and lenses:
$90 – B4 to M4/3 adapter
$64 – B4 to EF adapter
$127 – B3 to M4/3 adapter
$124 – B3 to EF adapter
General search for affordable B4 lenses on Ebay
Fujinon B4 lenses with 2x extender
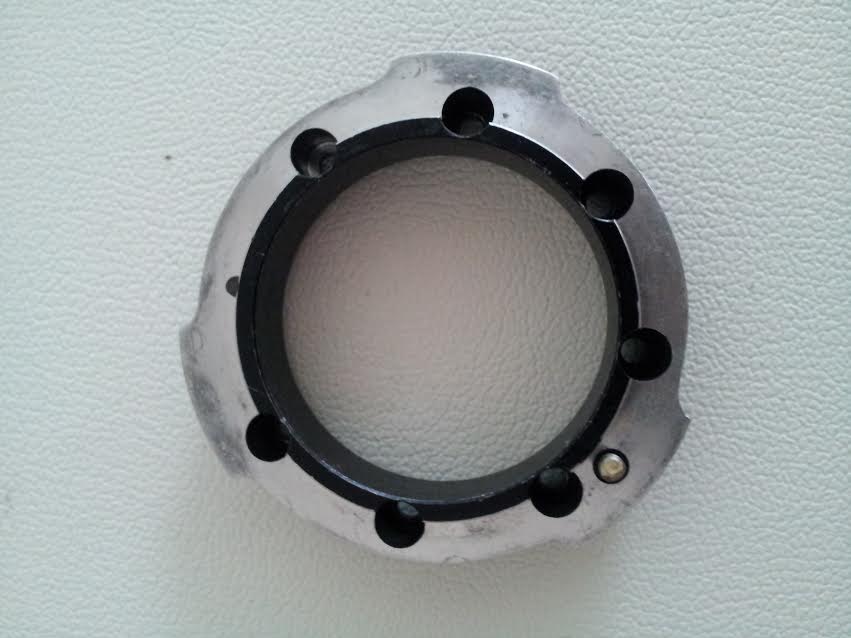
First thing to know about B4 Lenses is that they are originally made for broadcast ENG cameras which has a smaller sensor size than DSLR or M4/3 cameras, with the biggest sensor size being 2/3 inch then 1/2 and 1/3 being the smallest. However the smaller sensor sizes also often have a B3 mount instead of a B4. Below is an image of a B4 mount removed from the lens and a B3 is more like an inverted version of the Bayonette.
But to able to use these lenses there are some conditions or combinations to make them work. And of course the bigger the better, with the 2/3″ lens and with a 2x extender which also doubled he size of the image projected on the sensor help it quite allot, as it will fit the 4/3 sensor easily. But lets list the pro’s and cons of actually using a B4 lens.
Pro’s
- Long zoom range around 9-144mm with a continues fast aperture around f1.4 or f1.8
- Back focus for continues focus on the same spot with while zooming
- Servo zoom enable to do smooth zoom shots by using the servo zoom
- Nicer hold with hand strap to give a better hold than a normal lens
- Allot of special accessories to attach to the tripod head handles like remote zoom and remote focus
- Sometimes can these lenses can be found for cheap as people don’t know what its for
- Professional look and clients to take you more serious
Cons
- Heavy and large
- Not sharp wide open aperture as they are made for 3CCD and be more useful around 2.8 of f4
- Expensive lenses and accessories
- Need external power to enable power the servo zoom to make it work
- No auto focus

Determining the lens
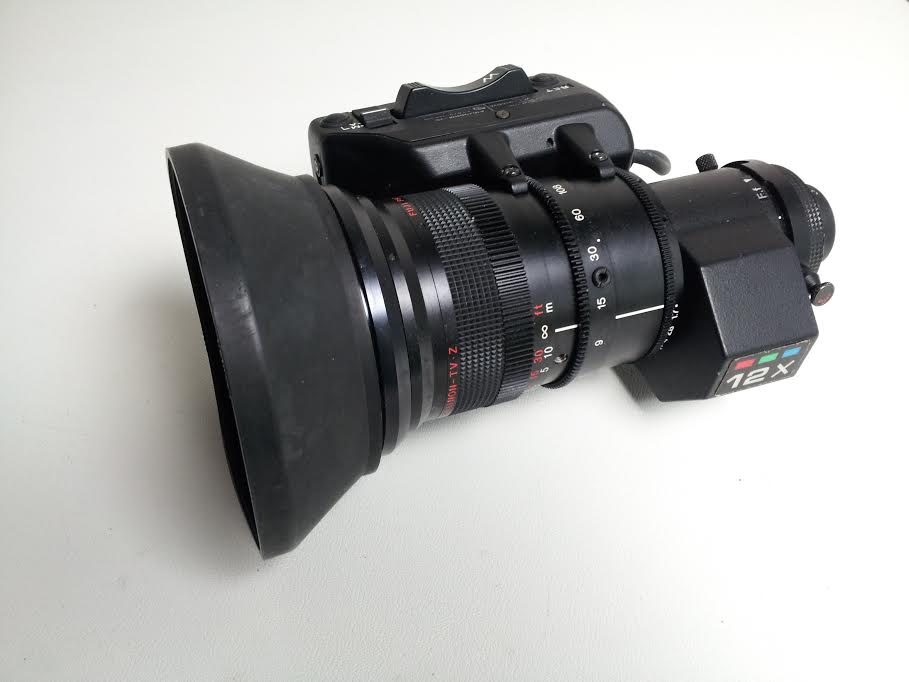
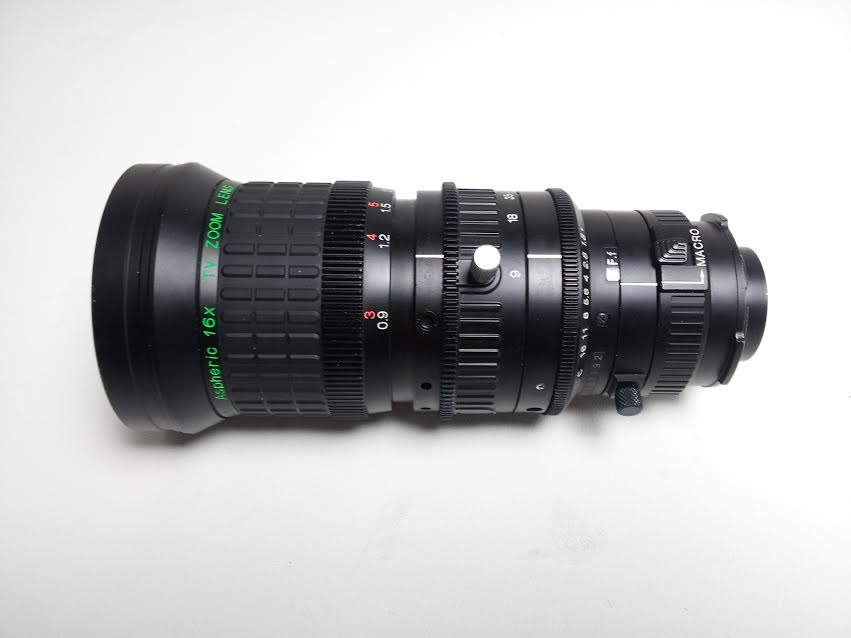
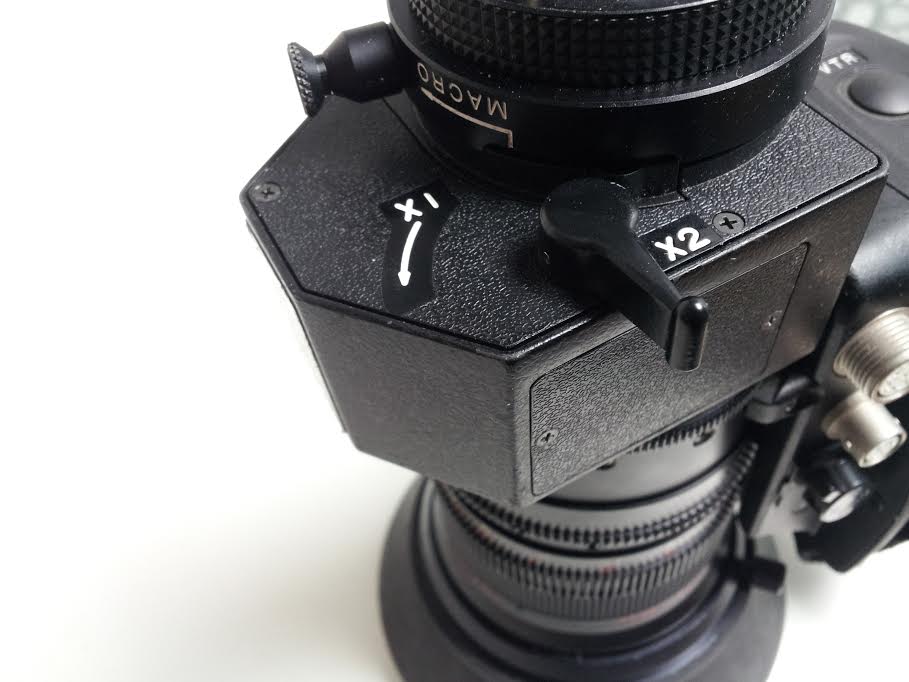
To find a 2/3″ B4 lens there are few things you need to know about first before buying any of them. Here below is a prime example of a B4 lens, but you have to look at several thing to actually know if its a 2/3″ or smaller or if it has all kinda of neat extra things. Some don’t have a doubler which is the big thing at the end with 12x labeled on this lens but often varies what saying on it. However this part sometime isn’t a doubler and could be a special crop which changed the lens cropping from 4:3 to 16:9. And will have to ask them to make a picture of the back of the unit, if it says 1x and 2x then its a doubler.
 However to dermine all the if you found yourself a 2/3″ lens there is often a code on top of the Servo which stat which lens you are using and have to match the code from a special list to see what kind of lens its it. The code you have to look at on this lens is the “A16x0BRM-28”.
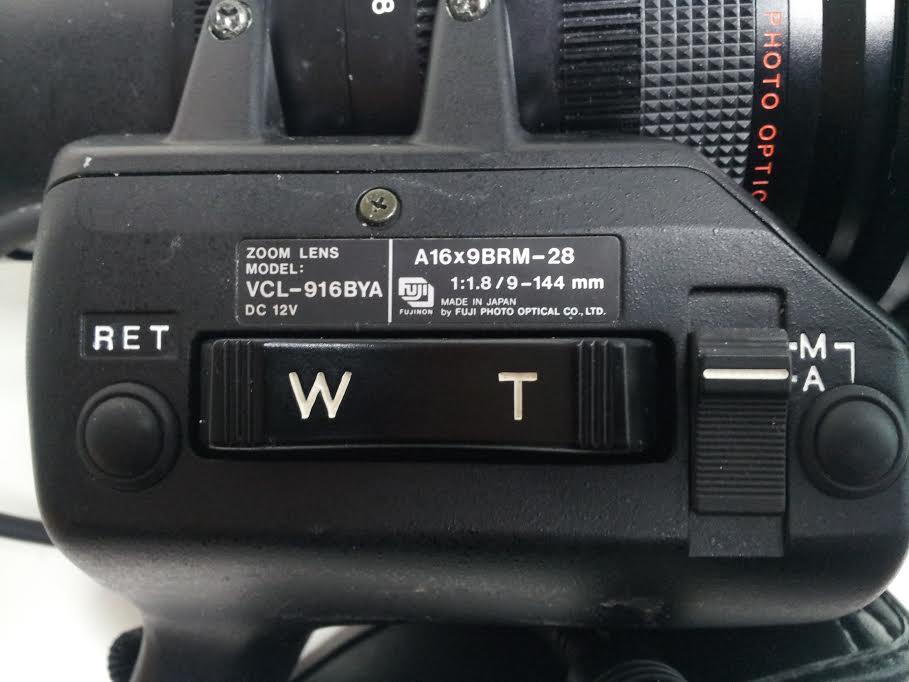
From the list here below we can see that this is a 2/3″ lens, because the first letter of the codes has an “A”. Mainly the important thing is to check the first few letters of the code to determine for which sensor the lens is. The numbers after often associate with the amount of zoom which on this lens is 16x time zoom from the widest 9mm. However this lens has no 2x extender as then would have an E in the final few letters.
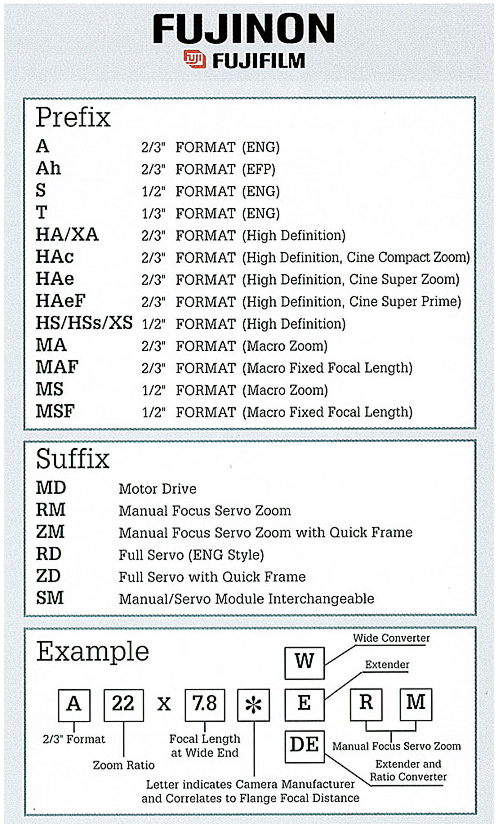
However there are also lenses released by Canon and Nikon. However there isn’t many informations about the Nikons, but we do have the same list for the Canon to compare which are the proper lenses. However its hard to remember all this so its best save these images or bookmark this post to quicker view these info.

But sometime owners remove the servo motor like the one below, as they rather have a compact manual zoom lens or donated it over to one that has a broken servo, and because its missing the servo its also missing the code. Then the only way to determine if it is a 2/3″ is by looking at the widest focal length of the lens. If the widest is 8.5 , 9, 9.5 mm it highly possible its a 2/3″, any lens with a smaller focal length of 5.5 or 6.5mm most likely be a 1/2″.
Canon DSLR
To combine it with a Canon DSLR you can currently only combine it with few models which is the Canon EOS t3i/600D and 70D which got a 3x – 10x digital zoom feature for movie recording at 1080p. However with other cameras you can achieve a zoom with Magic Lantern Raw features but not all cameras has it working that great yet, nor is it a great workflow for overall use. But even though you could use push the digital zoom to even use a 1/3 lens its not recommended. The better is to use a lens for a 2/3″ sensor and have the digital zoom at 3x to cover the sensor. And to mount it onto your camera you would need to use this $64 – B4 to EF adapter. However it does give allot of stress to the camera mount and would recommend to use a 15mm rail under the camera with supports to lessen the load on the camera mount. And to avoid using the 3x in camera you could also add this $156 – Kenko 1.4x Canon EF Extender
onto the Lens between the adapter and the camera so it would cover the sensor.
M4/3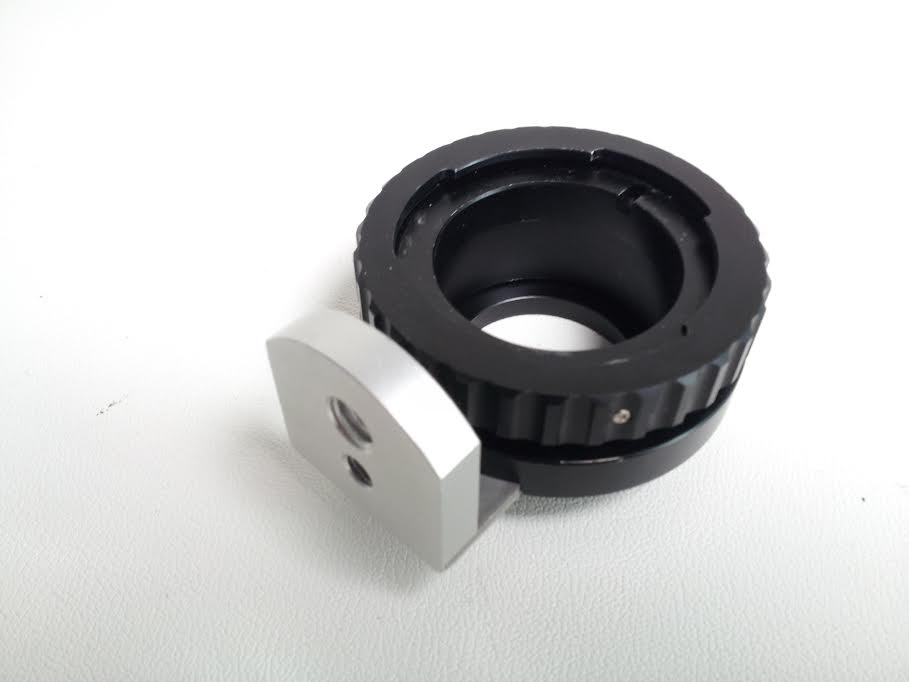
To attach the B4 lens to a M4/3 camera you would need this adapter $90 – B4 to M4/3 adapter. However the great thing about this adapter is that the weight of the lens and camera is carried on this adapter and have a tripod mount on the adapter itself. However to have the lens to cover the entire m4/3 sensor you would need the 2/3″ with a 2x extender. However an 2/3″ with 2x extender is quite expensive an often be sold around $500-1000 2nd hand. However a 2/3″ lens without a 2x be cheaper around $100 but then you need a M4/3 camera which has a build in digital 2x zoom or ETC mode. However the problem with ETC is that you would lessen the clean ISO range. For example my Panasonic G6 can film clean images at ISO3200 but with ETC on I wouldn’t film anywhere higher than ISO640 as higher would get more noise in the image.
The 2x extender is quite important and above you see the 2x extender on a Fujinon B4 broadcast lens. And just by using it on 2x the image would cover over the M4/3 Sensor, but you also would loose 2 stops of light, however you can still use the lens wide open instead of having to stop down. As your f1.8 lens would most likely become a f3.5 or f4 lens, however you can still use your full maximum ISO range, which can get a much better exposure with higher ISO range than being capped to ISO640 and have to stop down to f4.
There is also another way to mount a 2/3″ Lens without a build in extender and without having to initiate the digital zooms or ETC mode by adding an 1.4x or 2x extender to the combination, and have a multiple layer of adapters on your camera. First you would need this $64 – B4 to EF adapter and right after that you would need to mount a 1.4x extender either official one from Canon. And if you want to save some money and still get great image I would advice to get this $156 – Kenko 1.4x Canon EF Extender or $162 – Kenko 2x Canon EF Extender
to cover the entire M4/3 sensor and the 1.4x would of course give you a wider shot which be easier to work with than the 2x. And the 1.4x only looses 1 stop of light while the 2x looses 2 stops.
And then the last adapter you need is a $9 – Canon EF to M4/3 adapter to attach it all to your camera. And for this setup I do recommend to have a lens support to lessen the amount of weight on the mount of your camera. The problem is that its not that quite affordable but if you were able to get a cheap 2/3″ lens for 100 or less, this still might be cheaper than trying to find a proper 2/3″ with a build in 2x which often the seller sell for around $800-1000.
Beware of this! On Ebay there is a person selling a conversion mount to add a m42 extender. However the method is not right. As they would manufacture a replacement mount on the back of the lens, which you need to unscrew the original and screw on the new one. But from my own experience of trying to find the right matching mount to a lens is quite impossible. They might even look compatible while trying to fit them on only one screw be aligned correct. Even same branded lens have a totally different mount and flange distance and are not a universally compatible part of the lens and are made for specific lenses.
Powering the Servo
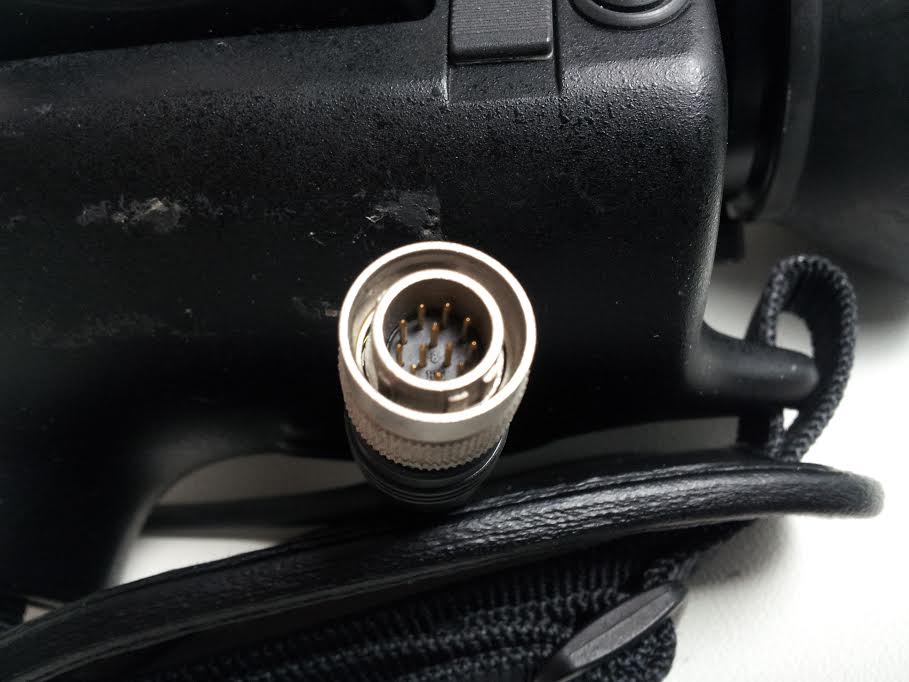
The only cable that comes out of the servo is mainly the one to power it. There is several ways you can power it even by chopping the cable and hacking which pin does whatt. But the easiest way is to buy a Hirose Cable however its quite expensive being around $60-90. However there are differences between the different brands of servo, like Canon you sometimes will find a 6 pin and most have a 12pin same with Fujinon. But sometime you will find one having a JVC servo which has an 8pin where you need additional adapter cable to change the 8pin to 12pin.
Here is a list of cables you can get:
And to power it all you need is this $40 – Rechargable 12v DC Battery as its slightly better than 12v mobile charger as this wont sleep and can power your battery and your camera at the same time. Also your servo uses only very little power and only need power when you press any of the buttons. Also if you rather recharge NPF or want to use it in combinations with Sony NPF batteries that also powers your camera and the rest of your equipment you might want to look at this $90 – NPF RIG power supply
.

However sometimes there are lenses missing the Servo Unit however the great thing is inside the brands the servos are quite interchangeable could donate the servo from one to the other. So a Fujinon Servo would fit on any other Fujinon B4 lens, while Canon will also fit on any other Canon B4 lens. However the JVC Servo Modules will only fit the lens the have been adapted to, as JVC often would use lenses from other brands but use their own Servo. Here above is a JVC unit and I had removed it from a Fujinon Lens and transplanted a donor servo from another Fujion lens. I mainly did this to avoid having to use the 8pin to 12pin adapter which cost $75 for just that cable while I was luckily to find a lens for just $10 as the previous owner did not knew what he was selling.
Examples
And to show you something I have shot with a B4 lens is this video of City Racing in Rotterdam which you can see enables me to get a nice wide and extreme close ups shots using this a B4 lens and able to capture the action at one single spot without having to run around and just zooming in and out. As it was possible to get a very close up shot of people standing all the way on the other side of the track and even quite a far zoom of a helicopter 500meters up in the sky.
And have to say this is also a great lens to film presentations and stage performances as you can place the camera quite far away and able to get the stage into the framing and also zoom in a large bit and even get nice tight close up shots of the people on stage. For the more professional even videographers these are perfect lenses to cover their uses and don’t need to change their lenses just use a single lens for everything. However the only think would be a 2nd camera with a large ultra wide angle lens as these lenses are not that known for their wide angle shots but more there normal to tele reach.
Setting up the back focus.
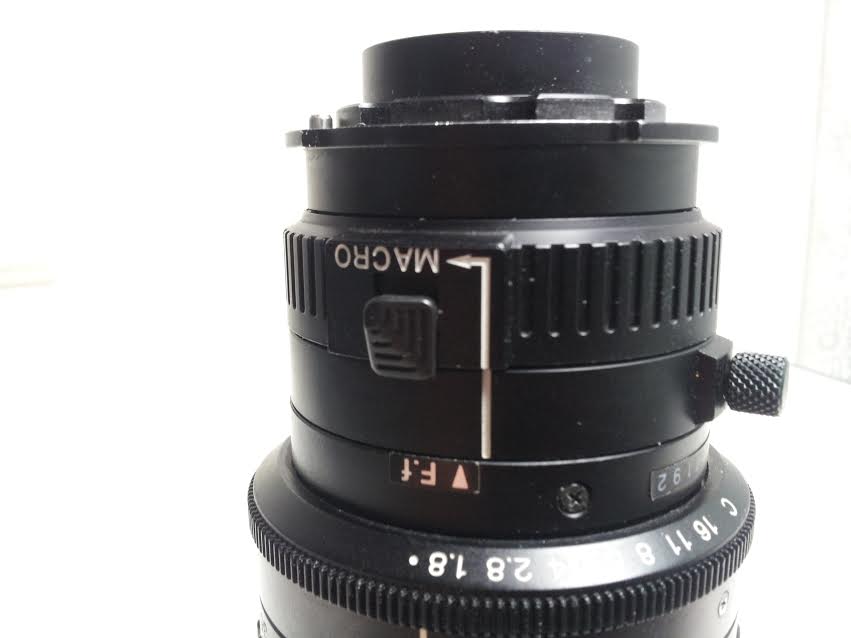
Once you have gotten your lens you might find that the focus is not correct or that its not even keeping the focus at the same place. First if you have Macro on the lens, you have to set it back to normal and most will give a click when its set back to normal. Then you need to download this backfocus-chart and print it. This is an essential piece you will need to set the back focus of your lens so it would properly focus and keep the focus on the correct spot. The last ring on the lens with a screw knob is for the back focus, you need to unscrew to be able to move this ring to set the back focus. Often there will be a sticker and a white line which shows you a standard backfocus which sometimes is already correct but most of the time be totally wrong, like the image above the arrow shows where the back focus is, but this is after setting the back focus and its off by a bit and even that little can make allot of difference.

To set the back focus you need print out the backfocus-chart and place it somewhere standing and have the camera with the B4 lens 3meters away from it. Without using the ETC mode zoom into the backfocus-chart and set the focus with the normal focus ring, then zoom all the way out and you might notice a slight focus shift or not. If not it might be already set correctly, but to double check it when zoomed out you have to use the in camera 5x or 10x digital zoom to check the focus on the backfocus-chart. If it’s slightly hinted out of focus, you have to rotate the last ring to get it back into focus. And now when you use the zoom on the lens to go in and out the focus will stay in place.
Conclusion
All in all its a very professional lens that can help you to improve filming events, presentations and stage performances as the big zoom range is really useful so you don’t have to switch lenses and just can keep filming.
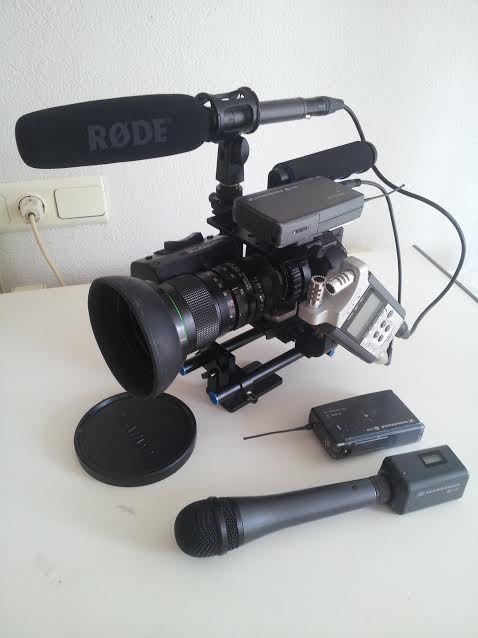
However to get your hands on these lenses you also have to be prepared to pay allot for the adapters and cables and more to make it all work. As when you use this its a step up and also tripod need to be a better on as it need to be able to handle the heavier weight. As these lenses weight close to 2kg. And this setup below actually weight 4.3kg all together with all the recorder and wireless receiver and microphone to get proper sound into the camera.
But to use this setup on top of a shoulder rig, you need quite allot of counterweight as the from be quite heavy from the lens alone. And would be quite heavy and most likely break you back having to haul all this weight. This lens I would say be more recommended to be used on top of a tripod or a Manfrotto Video monopod as you will be able to move it around without having to have the weight on your shoulder. But one thing you really need to add is a 15mm rail, its not for adding more accessories like a matte box or follow focus but to center the weight.
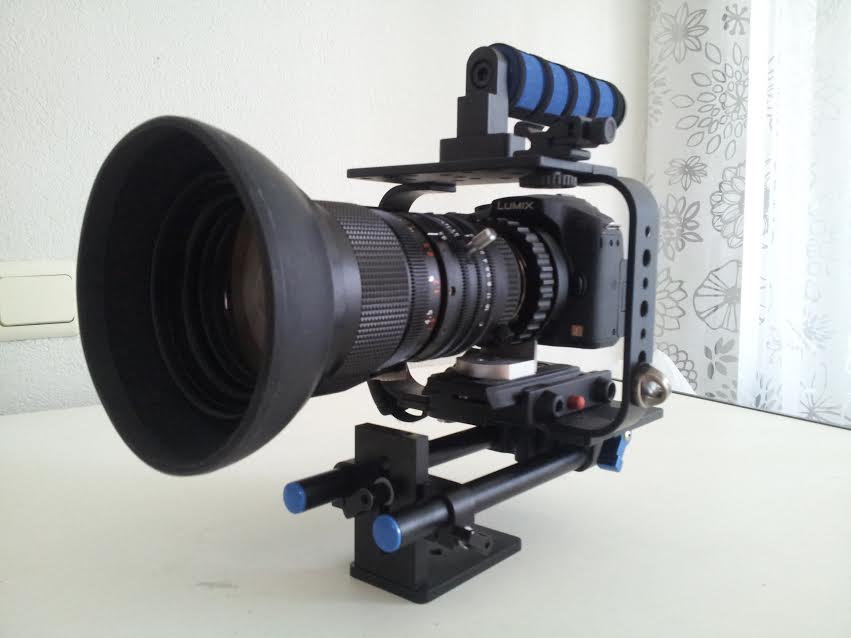
As above the the tripod mount is placed on the center instead of directly under the camera. As if it was under the camera you would have a problem of the camera being front heavy and often will cause the camera to be less stable as you be struggling to keep the camera level on a tripod. But when its in the center the be less hassle to tilt the camera and easier to keep it more stable.
But to able to find these lenses for cheap you must be lucky to find them at all. As more and more people are getting to know more about these lenses the prizes will rise. But also there aren’t that many of them for sale compared to photography lenses as these were used for specific broadcast cameras which only TV stations or some Film studios would use. As right now there aren’t that many people using these lenses on DSLR or M4/3 nor allot of professional new videographers know about them, only people from the TV broadcast know more about these lenses and know what they are worth. But one can only wish that companies would be made specific for M4/3 or larger lens cameras. Even though Canon has a Cine Servo lens but costing around $30.000. Either way for future trend there might be hope that one company could make them at a lower cost or that a company would make bring our a 2/3 sensor compact consumer camera with high performances. As at IBC there were allot of special action cameras with 2/3″ sensors with C-mount lenses but there B4 to C-mount adapters also build for these. And at IBC there were plenty of B4 TV Broadcast lenses displayed and also used, as it still something that is highly used in the TV broadcast environment and hopefully someday break also into the normal consumer market.
To find affordable B4 lenses on Ebay click here and a tip is to scout local thrift stores as often will heb some around while the seller at the show would not know the prices of them and rather sell them off quick for a small price.
If there is any more questions or you want to get the latest info about using B4 mount lenses, join the B4 on M4/3 group on Facebook here: http://www.facebook.com/groups/B4onM43/

hey I am a little confused. I have come across an old broadcast camera with a fujinon lens. it’s code on the side says:
T 17x 5 B RM 4
I don’t see “B” on your list of items on the code chart for fujinon lenses. it’s most likely a 1/3″ lens.
I have seen that Fotodio now offers a adapter kit for B4 lenses to m4/3 mounts. like the BMPCC. any chance a 1/3″ lens will work with a BMPCC?
thanks!
1/3 is too small best to find a 2/3 which will cover the sensor better. Fotodiox is quite expensive. Inside there is a link for an more affordable adaptor that works very good and cost only 90usd. The B is same as in the Canon list and mainly tells about there is a backfocus but most of them have a backfocus so that code often neglected.
First, Thank you for taking the time to post this thorough and invaluable information. I have been sweating over this for weeks and finally stumble upon you. You answered all my questions, but I’m afraid sellers at this point have already caught on because it seems there isn’t much under $300 that isn’t high risk or doesn’t look like its seen three tours of combat ENG. My original interest was in the fact that they all seemed to be the Swiss Army knife of lenses with their fast apertures, Wide Angles, Macro, and forever zoom ability but after a proper education thanks to you, The FAST is, well, NOT fast-
and WIDE not so wide, and for a couple hundred bucks more (provided someone didn’t unload their crap on you) you can save a stop of light! Which brings me finally to my Question:
Is it worth it having to pay top dollar to get the benefits of these lenses and avoid buying a paper weight vs just getting a camcorder like the Sony HXR-nx30U or 5U (just naming a couple). I know its not totally apples to apples.
I’m shooting M4/3, events, weddings, interviews, films and commercials. GH4/Omd Em1
Again Great job on this!
Hey! I have a little question, If you have a B4 lens without doubler/extender, would the Kenko 1.4x Canon EF Extender help to cover the whole 35mm sensor? Or do I still need a B4 lens with doubler 2x? Many thanks!
For full frame 35mm you need 2x on top of the build in 2x to make it work.
Hey , I must say this is such an informative article with regards to B4 lens. And even after couple of years of publication, it is still strongly relevant and this brings me to my question, I am planning to add a B4 lens to my production kit. The intention is to use it with adapters on a Canon 5d mkiii (full frame) and a Blackmagic Ursa (Super35mm) , depending on anyone I decide to use as main Camera during production. Through the cause of my web search I realized that the 2x extender version is highly recommended and I agree to the ideas behind that. However, I would also love to know if it is compulsory to make sure that the B4 is a High Definition (HD) version . What are the pros and cons of choices on HD /SD B4 lens?
Thanks in advance
I just discovered how to tell a 2/3″ lens from a 1/2″ lens without the code. Assuming both are B4, the locating pin on the back of the flange is bigger on a 1/2″ lens so that it won’t fit on a 2/3″ mount.
Diameter are: 3mm for 2/3″ and 3.5mm for 1/2″.
Hi Chungdha, thanks a lot for your time and help with all the good info.
My question to you or any of the group who can answer is: The combination you explained above with the EF teleconverter, could be done instead with the olympus 1.4 teleconverter in between the camera and a B4 to m43 adapter?
What’s needed to use this with my BMPCC?